
In this series of articles, I’m doing a walkthrough of a hobby project I’ve worked on, a payment system for the Ethereum blockchain. You can read the intro article for more context about the project.
For this article, I will assume that you have read part 1 about authentication and wallet management, and part 2 about the data models used in the system. Therefore, I will start from the assumption that you’re aware of the basic foundation on how to let users connect their crypto wallets to as website, how to display a list of available digital products that they can buy from, and that you are also somewhat familiar with the data models presented in part 2.
In this part, I will cover how payments are processed and validated. This includes the following steps, in order:
- Server-side prevalidation: validating, before even processing anything, that the wallet is authorized to buy a particular digital product, and that this product is available.
- Purchase: sending a payment transaction to the Ethereum blockchain for the required price, and getting a transaction identifier in return (also called a “transaction hash”)
- Polling the blockchain: using the transaction hash to check if the transaction has succeeded or failed.
- Triggering post-payments actions: dealing with the aftermath of the transaction status, which means showing an error message in case the transaction failed, or starting further steps by allowing access to resources in case the transaction succeeded.
The Ethereum blockchain makes it very easy to process payments, because every transaction is given a unique transaction hash, which means that once you have submitted a transaction to the Ethereum network for validation, all you need is this transaction hash, and you’ll be able to track the status of the transaction by polling the Ethereum blockchain.
In reality, for a small application such as the hobby project I’m presenting here, there is no need to poll the Ethereum blockchain directly. Instead, my program uses a third-party provider that makes polling the blockchain easier via an API. Many medium to large applications nowadays are running their own Ethereum nodes so that they can poll the blockchain directly. It costs them extra teams and complexity to maintain that infrastructure, but it comes with the benefits of higher trust and control of their data, and also processing speed. For them, the tradeoff is worth it.
Processing Payments
Below is a systems diagram showing how I have implemented the payment processing part. It assumes that the user has connected his wallet and already obtained a JWT that identifies him uniquely.
The diagram contains a description of each step, and the rest of this section gives further details as to what happens in each step.
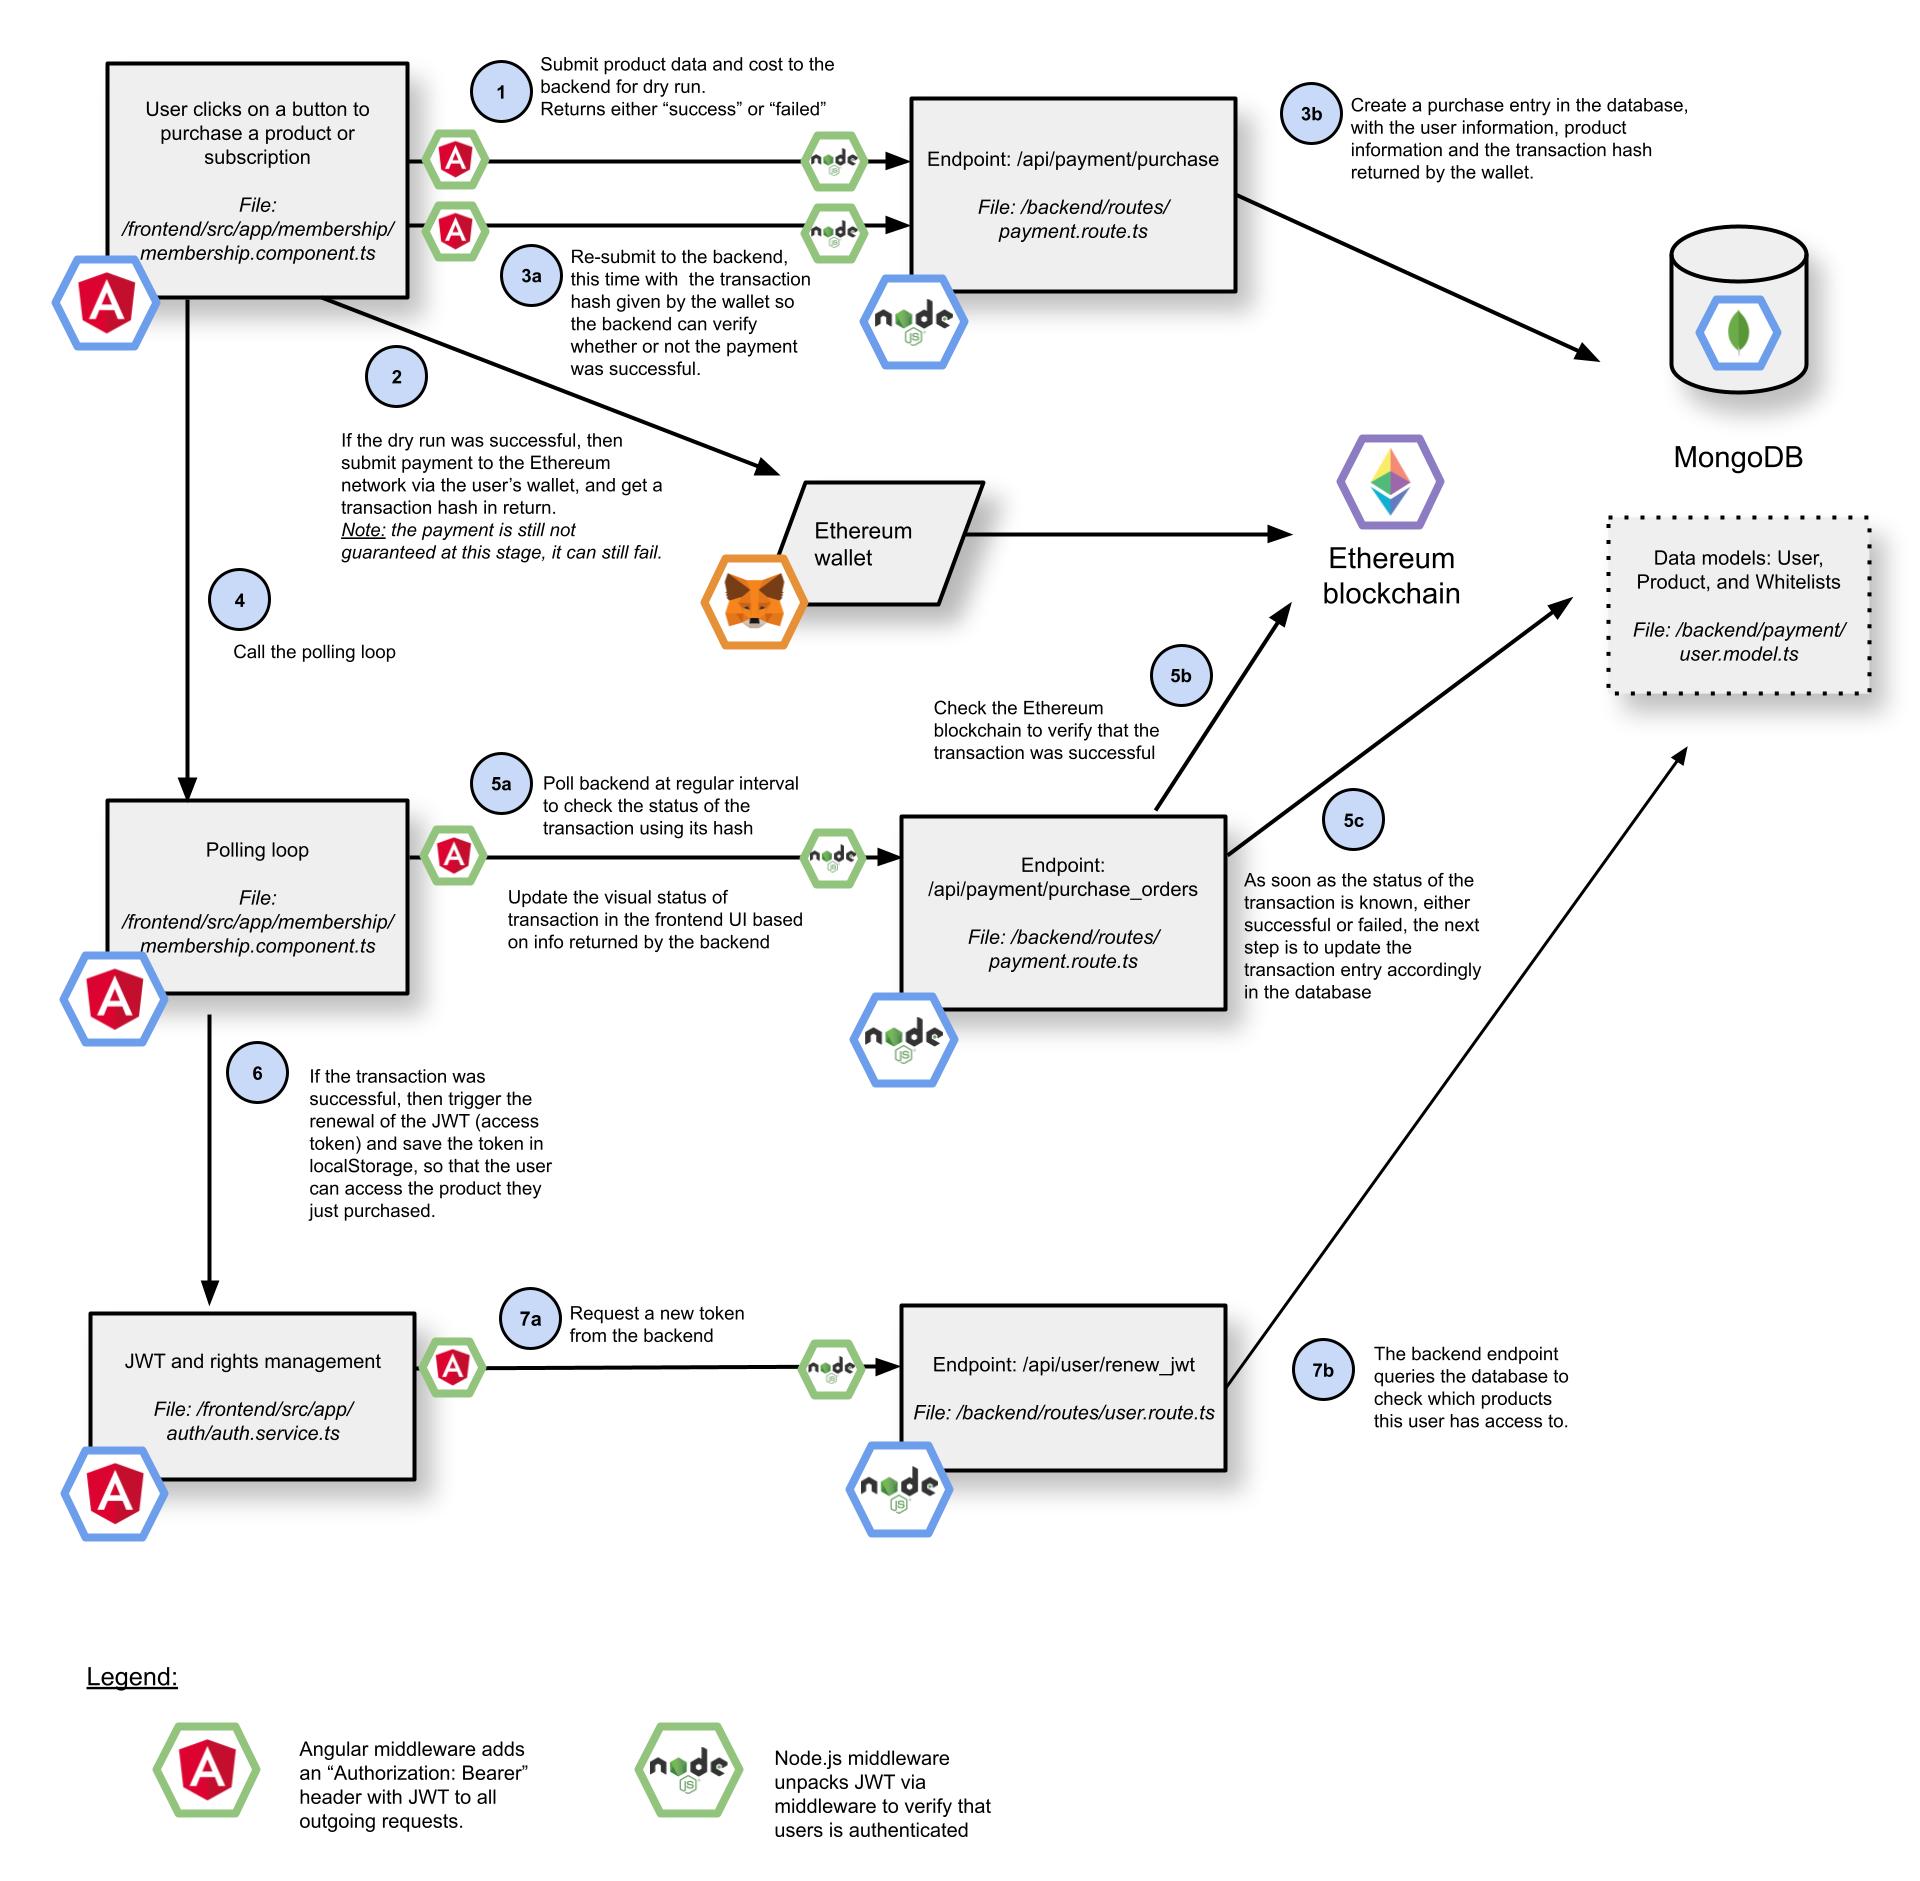
Dry Run
Step 1 does a dry run of the transaction. The reason why I’ve done it this way is because it helps detecting failure and preventing most fraud cases as early as possible. In the rest of this section, I will use the term buyer as an equivalent for user, and seller as a equivalent for website owner.
Indeed, validating a purchase requires that the buyer has paid the amount required for the product or subscription, and for this, the buyer needs to submit the transaction to the Ethereum blockchain first, so that both the buyer and the seller can look at the same transaction hash and independently agree on whether the transaction was successful or not.
Consequently, if there are any issues such as a product not being available or the buyer trying to apply an invalid coupon code, then the seller would want to know before submitting a payment to the blockchain, because then the seller would put the buyer in a situation in which his has to contact the seller, and the seller would have to exchange messages to figure out which transaction was invalid, what went wrong, and so on, then send the buyer a refund or give access. This is a manual process that’s very cumbersome and unnecessary, and most failure cases can be avoided by validating the purchase flow beforehand.
So this is why I’ve implemented the system in a way that it verifies everything it can about the purchase before actually accepting any payment, by doing a dry run. If the purchase is invalid at this stage, an error message is displayed to the buyer who can then retry.
If the purchase data is valid, then the frontend triggers step 2, which is a call to the buyer’s wallet browser extension to submit a real payment with the correct amount to the seller’s wallet address, and then it takes the transaction hash returned by the wallet, and sends that hash to the backend via steps 3a and 3b, which is the same as step 1, except that now the purchase get executed for real and not longer as a dry run.
Payment Retry Logic
When processing a purchase, after the transaction is sent to the blockchain via the user’s wallet, it is sent to the backend server to be stored (steps 3a and 3b). With the way that the transition between those steps is currently implemented, if something fails between step 2 and step 3b, then it is possible that the payment was valid but that it wasn’t stored in the database, and therefore will not allow the user to gain access to the product he paid for, as seen in this source file.
A possible improvement would be to encapsulate the call to paymentService.createPurchaseOrder() into a loop that would retry creating a purchase order in the backend until it succeeds, e.g. retry N times before reporting failure, and have some sort of exponential backoff. This will work because (1) transaction hashes on the Ethereum blockchain are unique and can therefore be used as idempotency key, and (2) I’ve implemented the createPurchaseOrder() method so that it is able to handle re-entrant requests: two two calls with the same transaction hash will result in a single entry being created in the database, and not duplicate entries.
Saving The Purchase
In step 3b, the backend takes the transaction hash and saves it in the database as proof that the purchase happened, and it does nothing else, meaning that it doesn’t wait around to poll the Ethereum blockchain to check on the status of the transaction, and it won’t either grant or deny access to the product or resource the user wanted to purchase.
I did this on purpose: many things can go wrong with distributed systems, so I wanted to have one part of the system simply store the purchase data, and then have another part poll for any unresolved transactions known in the system for a user and take care of the access granting at that moment. This way, even if something goes wrong after the purchase was saved in the database, as long as the purchase and its transaction hash were saved, the retry logic of the polling method will eventually retrieve the status of the transaction from the blockchain and will resolve the purchase into its final state.
Note that it’s not because there’s a dry run in step 1 that step 3a and 3b are going to always work correctly. Things can still go wrong and break in those steps, but at least the failures should not come from incorrect data or missing products, those should be less predictable and less frequent failures, such as network partitions, out of memory errors, and so on, which additional the retry logic for steps 2 and 3a would alleviate, as described in the previous section on “Payment Retry Logic.”
Polling Transaction Status and Resolving Purchase
If step 3b was successful, then the frontend will receive a success return code, and in step 4, it will jump to the purchase status polling code. To implement this polling method, I’ve used JavaScript’s setTimeout() function, so that the frontend would send a request to the backend every 10 seconds and get the status of the purchase, based on the transaction hash, until it gets a valid state, i.e. the Ethereum blockchain reports that the transaction processed by the user’s wallet is either successful or failed.
Step 5a on the diagram represents the polling logic, step 5b is the call to the Ethereum blockchain, and step 5c represents the purchase resolution step, which is what happens when the Ethereum transaction is processed on the blockchain. Note that here when I say “resolving”, I don’t mean authorizing or succeeding, but getting to an end state which is resolved and final, and can be either successful or failed.
Once step 5c is reached, if successful, then whichever product or resource that was gated by payment is now authorized for the user as identified by his wallet address, and the database gets updated with the correct user data which will reflect those newly acquired access rights. Conversely, if the Ethereum blockchain marked the transaction as failed, then the purchase will be marked as failed too in the database, and an error message will be displayed to the user.
Join my email list
Polling Retry Logic for Payment Resolution
Something could fail at any point within steps 5a, 5b, or 5c, which is what the polling retry logic is here to guard against. However, there is another scenario, more dramatic, in which something unexpected happens in the user’s web browser—program crash, tab closed by mistake, and so on—and in that case the retry logic wouldn’t even execute.
To prevent such situations from ending in hung or unresolved purchases, I’ve added an extra polling loop (see source code) in the frontend membership page which checks if there are any unresolved purchases for the user, and if so, it tries to resolve those purchases by applying the same logic as for an in-progress purchase. So in case the polling for the initial purchase resolution didn’t work, all that the user will have to do is open the membership page and the same resolution logic will be run.
An alternative solution could be to have a cron job running in the background that would go over all unresolved purchases for all users, to try and resolve them. One major caveat is that it’s an extra moving piece that would need to be rolled out, scheduled, and also monitored for failures, and it would also require some sort of logic in case the list of unresolved purchases ever became too large and handling that list ended up being too slow.
For that reason, I have preferred to go with what seemed like a simpler solution: have the retry logic as part of the backend request triggered for a user when this user visits the frontend membership page to check what purchases and products are available to him. There is one scenario in which you’d absolutely want to have a background cron job: this is if the purchase is supposed to trigger a product or subscription that is time sensitive, and which you’d want to activate and resolve without having to wait for the user to come back and check on his purchase.
I have added a method named handlePendingPurchaseAll() which loops over all pending purchases and tries to resolve them, which you can find at this link in the repository. If you wanted to implement a background cron job like I just described, all you have to do is call this method in a scheduled cron job and it would do the trick.
Authorization Via a JSON Web Token
For this simple hobby project, I have decided to implement a time-limited access for a product, which represents a subscription and which will expire once its duration is over. I chose this because a time-limited subscription can easily be extended into a binary “yes/no” product access—a web product, a PDF file, a newsletter—but the opposite isn’t true.
Once the database is updated in step 5c, the frontend jumps into the final step which is the renewal of the JWT (JSON Web Token). If you recall part 1, about Authentication and Crypto Wallet Management, those tokens are how the system handles user authentication. In addition to doing simple authentication, i.e. giving either access or no access to some parts of the frontend website, I’m now extending the granularity of this access by doing authorization, i.e. allowing the user to access more functionalities or products that he has paid for, and this, for the duration that this access is valid.
Steps 7a and 7b are where the frontend calls the backend endpoint that will renew the JWT, by querying the database for the latest information about what the user should have access to, and by creating a new JWT for this user, who can now use it to access the product or service he has paid for. The JWT is stored in the localStorage space of the browser, and will be used by the frontend app to get access to resources from the backend.
Once the duration runs out, or if the access is revoked, the data contained in the JWT would be used by the backend to detect the lost access and block the user, and would generate an update JWT with less access.
Error Management
In order to improve on the system and understand what could go wrong if ever users are reporting that their purchase didn’t work correctly, I have made it so that all exceptions thrown in the /purchase endpoint or in the /wallet_nonce endpoint will be storing the full error stack trace in a special dedicated MongoDB collection via the logError() method, which can later be retrieved for debugging to backtrack what could have gone wrong. The source code for this method and its module can be found here.
Transactions and Idempotency Keys
Finally, two important concepts that one has to know and use when developing a payment system are database transactions and idempotency keys.
Database Transactions
Database transactions ensure that if the program fails at any point while modifying multiple database tables, it won’t leave the database in a broken intermediate state, and instead it will roll everything back to a previously valid state.
Below is an example of a transaction that updates three separate MongoDB collections and commits only if all three updates were successful, and aborts and rolls back to the initial state if anything wrong happens. Don’t pay too much attention to any details in this piece of code, I’m just putting it here to illustrate that multiple collections are being updated and that if an exception is raised, the transaction is aborted.
Idempotency Keys
With idempotency keys, you ensure that if a request is submitted twice to the system, it will not create more than one entry in the database, to avoid issues such as double payment, or giving double access or double duration by mistake.
To some extent, transaction hashes on the Ethereum blockchain can be considered as idempotency keys, and therefore one can use those as unique identifiers in database queries to ensure the idempotency of operations.
The snippet of code below shows the call made to the MongoDB database to store the transaction hash during step 3b. You will notice that the first part of the query matches the transaction on the translation hash (case insensitive), and the bottom part has the option { upsert: true } where “upsert” here means update-insert, i.e. the query will insert a new record if the transaction hash doesn’t already exist in the database, and in case a record with this transaction hash already exists, it will update the record and not create a new one, hence idempotency.

Idempotency keys are how you can deal with another important aspect of distributed systems, which is that you cannot have exactly-once delivery, meaning that in practice you cannot guarantee that you can deliver a message to a recipient once, and only once. You can read more on the topic in Tyler Treat’s article.
Instead, you can guarantee at-most-once delivery, i.e. the message will be delivered at most once or it won’t be delivered, or you can guarantee at-least-once delivery, i.e. the message will be delivered at least one time or multiple time to the recipient.
So in the case of a payment system in which you’d like to handle every transaction once and only once, you have to rely on the principle of at-least-once delivery, and use idempotency keys and database transactions to make sure that processing the same transaction hash more than once will always result into the same identical result on your side. I highly recommend that you read Brandur’s excellent article on idempotency keys.
Infrastructure
This hobby project showcases source code, but there’s another key aspect that needs to be taken into account when building a reliable payment system, it’s the infrastructure.
In order to achieve high-enough reliability, you have to be aware of the CAP theorem and how it plays in practice. I didn’t mention it until now, but the database storage I’ve picked for this project is MongoDB, which is a collection store that can easily be replicated on multiple nodes across different availability zones, and ensure that user data can be available even under various failure scenarios.
In addition, you’d want to run the backend web service on multiple nodes or servers with the tools of your choice—e.g. Docker Swarm, Kubernetes, self-hosted dedicated servers—and you’d want that pool of nodes behind a load balancer. This setup is what a minimal infrastructure should look like in order to cope with the majority of the failure modes for a payment system. It has nothing to do with payment systems in particular, it’s sort of a basic foundation that you’d expect any highly reliable website to cover.
The best practices of building reliable distributed systems in production goes beyond the scope of this article series. If you wish to dive into the topic, I recommend that you read the books that the Site Reliability Engineering group at Google (SRE) has put together and has made available for free on their website.
What’s Next?
This concludes the walkthrough of this Ethereum payment system. The source code is still fully available in this repository.
In the next and last part, I will share what I learned while developing this project in terms of tech specificities that you should keep in mind while developing for the Ethereum blockchain, but also in terms of product design and possibilities.
Be First to Comment