In this series of articles, I’m doing a walkthrough of a hobby project I’ve worked on, a payment system for the Ethereum blockchain. You can read the intro article for more context about the project.
I have covered the majority of the technical details in parts one through three. In this fourth and final part, I will to cover the following:
How to extend the code to support more features or data providers
Important things to consider when dealing with blockchain data
Insights on what blockchain and web3 can enable in terms of product experience design
The content of this article will feel like a collection of somewhat disconnected ideas, and the goal is to do a brain dump of the biggest takeaways and learnings I had while I was developing a system for the Ethereum blockchain.
In this series of articles, I’m doing a walkthrough of a hobby project I’ve worked on, a payment system for the Ethereum blockchain. You can read the intro article for more context about the project.
For this article, I will assume that you have read part 1 about authentication and wallet management, and part 2 about the data models used in the system. Therefore, I will start from the assumption that you’re aware of the basic foundation on how to let users connect their crypto wallets to as website, how to display a list of available digital products that they can buy from, and that you are also somewhat familiar with the data models presented in part 2.
In this part, I will cover how payments are processed and validated. This includes the following steps, in order:
Server-side prevalidation: validating, before even processing anything, that the wallet is authorized to buy a particular digital product, and that this product is available.
Purchase: sending a payment transaction to the Ethereum blockchain for the required price, and getting a transaction identifier in return (also called a “transaction hash”)
Polling the blockchain: using the transaction hash to check if the transaction has succeeded or failed.
Triggering post-payments actions: dealing with the aftermath of the transaction status, which means showing an error message in case the transaction failed, or starting further steps by allowing access to resources in case the transaction succeeded.
The Ethereum blockchain makes it very easy to process payments, because every transaction is given a unique transaction hash, which means that once you have submitted a transaction to the Ethereum network for validation, all you need is this transaction hash, and you’ll be able to track the status of the transaction by polling the Ethereum blockchain.
In reality, for a small application such as the hobby project I’m presenting here, there is no need to poll the Ethereum blockchain directly. Instead, my program uses a third-party provider that makes polling the blockchain easier via an API. Many medium to large applications nowadays are running their own Ethereum nodes so that they can poll the blockchain directly. It costs them extra teams and complexity to maintain that infrastructure, but it comes with the benefits of higher trust and control of their data, and also processing speed. For them, the tradeoff is worth it.
Processing Payments
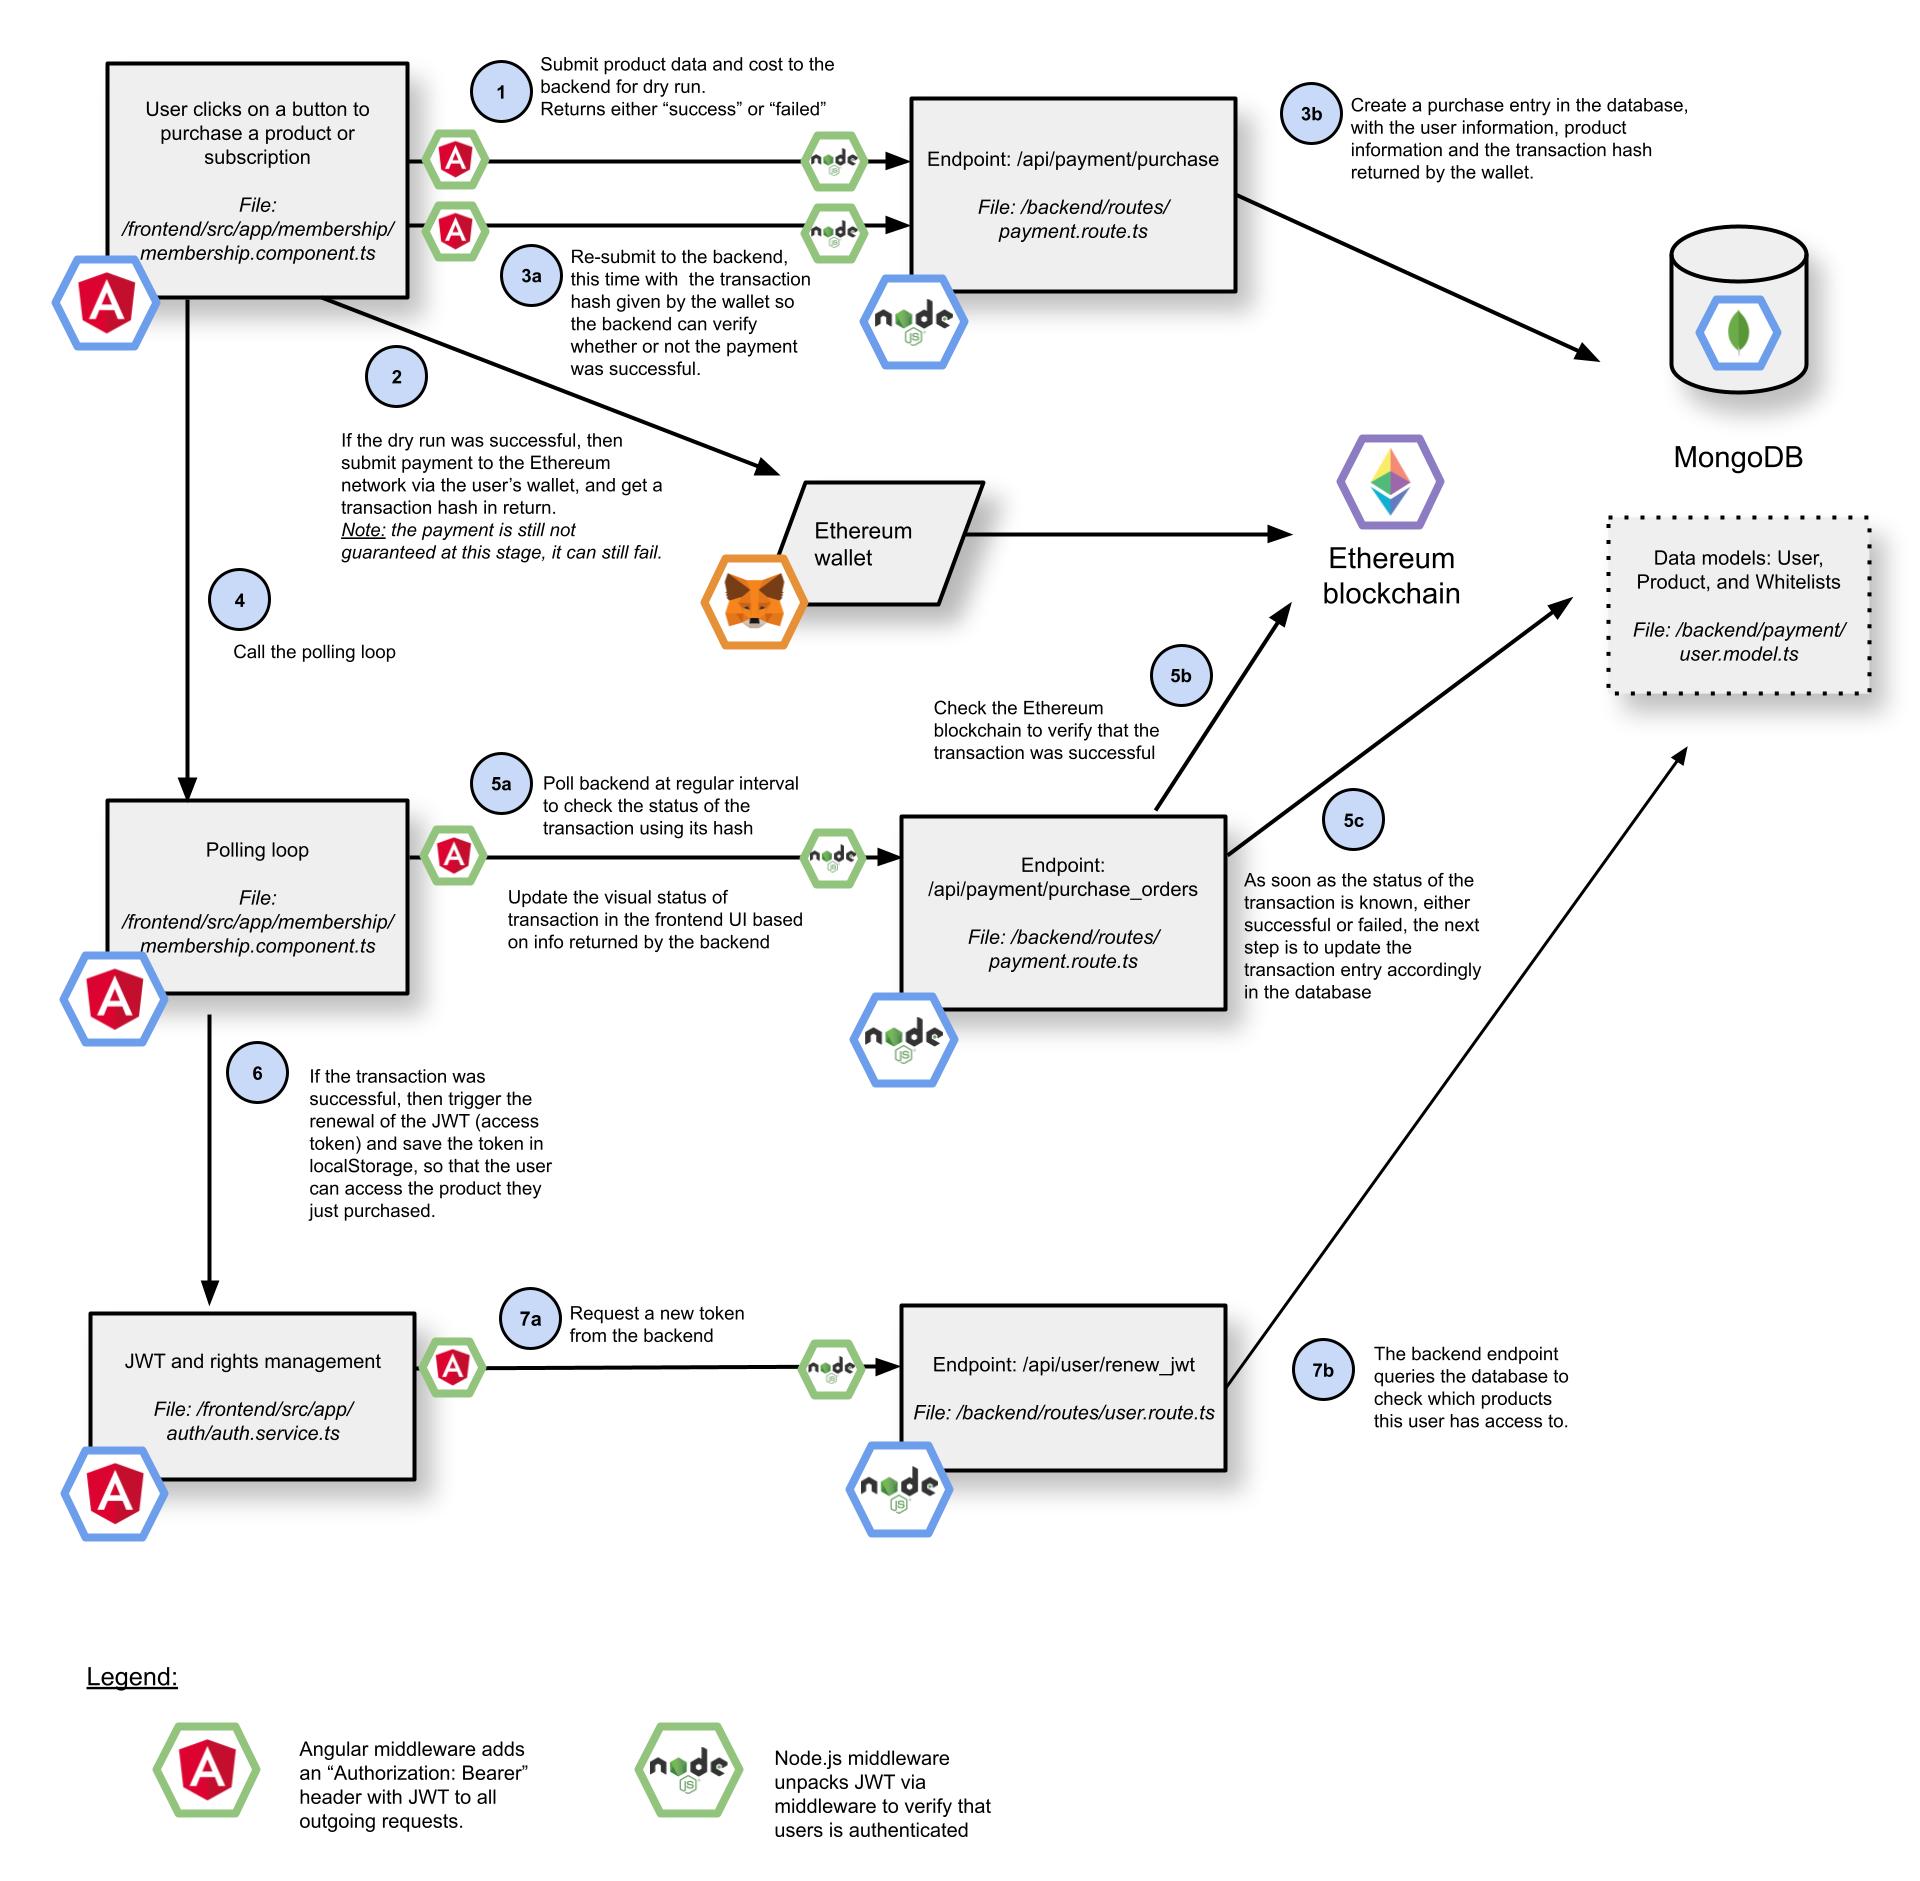
Below is a systems diagram showing how I have implemented the payment processing part. It assumes that the user has connected his wallet and already obtained a JWT that identifies him uniquely.
The diagram contains a description of each step, and the rest of this section gives further details as to what happens in each step.
Systems diagram showing how a purchase gets processed, from the user clicking the payment button and the transaction that it triggers on the user’s wallet, to validating that transaction and creating a new JWT to give the user access. (click on the image to enlarge)
In this series of articles, I’m doing a walkthrough of a hobby project I’ve worked on, a payment system for the Ethereum blockchain. Go read the intro article for more context about this project.
In this part, I will cover the following topics:
Product details, whitelistings, coupon codes
Displaying purchases and subscriptions, products available, and past purchases
Data models for products and whitelistings
None of what is described in this article is about web3, it’s all really web2 development. However, I do have to describe it to lay the foundation for parts 3 and 4 that will be focused on interacting with the blockchain, and with a recap of what I’ve learned about what crypto wallets and blockchain for developing mass-consumer product experiences.
Below are the data models used for products, purchases, and whitelistings and coupons (click to enlarge).
The data schemas used to represent products, purchases, and whitelists/coupons (click to zoom)
The follow diagram shows three user flows: the first flow shows products for non-signed in users, the second flow for signed in users, and a third flow just to display the current status of the access rights.
System diagram showing three user flows to display available products, past purchases, and current access rights.
In this series of articles, I’m doing a walkthrough of a hobby project I’ve worked on, a payment system for the Ethereum blockchain. Go read the intro article for more context about this project.
In this part, I will cover the following topics:
Connecting a crypto wallet via a frontend, and detecting states in MetaMask
Backend endpoints needed to manage wallet connections, wallet signature, and JSON Web Tokens.
Data models for users.
You will find that there isn’t much complexity in this article. Authenticating a crypto wallet is most about calling methods from the wallet API from the frontend, and then passing data around between the frontend and the backend for verification.
Connecting a Crypto Wallet
Whatever software you build that will have to interact with the Ethereum blockchain, either reading data or transacting, you’ll need to connect to an Ethereum node to access the Ethereum blockchain.
For most use cases, you won’t be running your own Ethereum node, and you won’t be calling directly any Ethereum node either. Instead you’ll use a third party that offers a centralized point of access to the blockchain: you connect to their backend servers, which are connected to the blockchain. It’s kind of counter-intuitive that we have to use centralized third party providers when you think about it given that one of the core tenets of the blockchain is that it’s fully decentralized, but that’s what we have to deal with these days.
As a human user of the blockchain, you need a crypto wallet to initiate various actions and execute smart contracts. Every Ethereum client implements the same JSON-RPC specifications, which is the standard that applications can rely on to interact with the blockchain.
Over the past few years, I’ve oriented the content of this blog towards engineering management and tech leadership, and consequently, I haven’t written anything purely technical for a while. Some of my most technical article series ended up finding a large audience, namely Implementing a Key-Value Store, and Coding for SSDs, and it now feels like it’s been an eternity since I wrote them.
Crypto protocols have made a serious dent in the tech space, and even more so over the past couple of years, often referred to as a whole as crypto or web3 technologies. With my personal commitment to keep upskilling myself, I have decided to make it a top priority for me to understand how blockchain technology was built and operated, and what kinds of businesses and product experiences this technology could enable in the long term.
I decided to build something basic yet complex enough that it would force me to interact with blockchain data in interesting ways. Because token transactions and crypto payments are simplest interactions on the blockchain, I settled on building a payment system.
Therefore in this series of articles, I will be sharing how I implemented a fully-functional payment system on top of the Ethereum blockchain, with the following features:
Managing a list of products and time-bound subscriptions. Allowing for coupons and whitelistings.
Displaying the current and past purchased products for a user.
Guiding users through payment transactions on the Ethereum blockchain, by connecting their Ethereum wallets.
Handling complex situations of network and service disruptions, to prevent double payments, avoid hanged transactions, and cover all other edge cases. This is mostly done by making all operations idempotent and idempotency keys.
Monitoring the Ethereum blockchain to verify that payments for a particular product has been received.
Once payment has been received, allowing paid users to access the private parts of a website by signing on with their Ethereum wallet to authenticate.